Friday, March 25, 2016

Even more easily use a Navigation Bar without a corresponding Navigation Controller!

Well, so I wrote up this set of steps to add a navigation bar independent of a navigation controller:
Easily use a Navigation Bar without a corresponding Navigation Controller

Only to find that there's an even EASIER way!

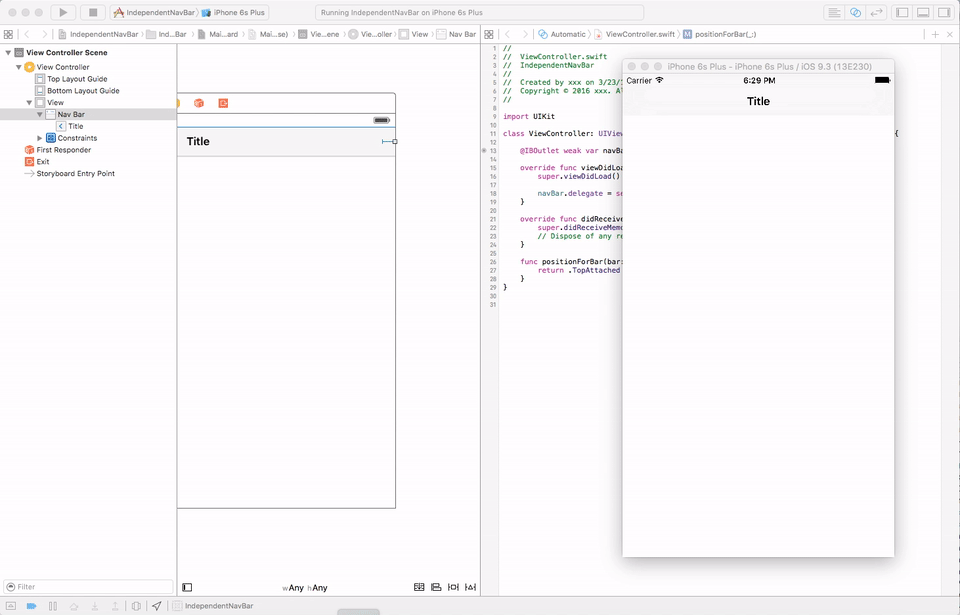
Posted by joerick on Stack Overflow, you can do this in 3 steps - completely within the storyboard:

1) Add your navigation bar.

2) Add your constraints:
  • Navigation Bar.Top = Top Layout Guide.Bottom
  • Navigation Bar.Leading = Superview.Leading
  • Navigation Bar.Trailing = Superview.Trailing

3) In the Identity Inspector for the bar, add a user defined attribute:
  • Key Path: barPosition
  • Type: Number
  • Value: 3

That's it!

Many thanks to joerick! If this helps you, give 'em a vote up:
ios - Is there a way to change the height of a UINavigationBar in Storyboard without using a UINavigationController? - Stack Overflow


Again, here are some GIFs to show you the details:

1) Add your navigation bar. Just center it and click it to the guide. Don't worry about the weird space at the top.


2) Set the constraints for the navigation bar in the storyboard. All should have a constant of zero and a multiplier of one. Note: Ctrl-click to connect the navigation bar with the view in the outline; shift-click to select multiple items in the list:
    - Navigation Bar.Top = Top Layout Guide.Bottom
    - Navigation Bar.Leading = Superview.Leading
    - Navigation Bar.Trailing = Superview.Trailing


3) In the Identity Inspector for the bar, add a user defined attribute for barPosition, give it a type of Number, and give it a value of 3.


4) As you can see, you still get the same result - a normal, autoresizing navigation bar!


Thursday, March 24, 2016

Easily use a Navigation Bar without a corresponding Navigation Controller

Recently I had to wrangle with an independent navigation bar, without a corresponding navigation controller. My challenge was to get the bar to resize appropriately, as it would normally do if it had a navigation controller - and do it primarily via the storyboard.

It turned out to be surprisingly easy!

Here's the short version:
1) Add the navigation bar to the view controller in the storyboard.

2) Set the constraints for the navigation bar in the storyboard:
    - Navigation Bar.Top = Top Layout Guide.Bottom
    - Navigation Bar.Leading = Superview.Leading
    - Navigation Bar.Trailing = Superview.Trailing

3) Connect the storyboard's navigation bar to its view controller as an @IBOutlet.

4) In the view controller's class, add a UINavigationBarDelegate protocol to the class declaration.

5) In the view controller's viewDidLoad method, set the navigation bar's delegate to self.

6) In the view controller, add the bar positioning delegate's positionForBar method. Return the UIBarPosition representing TopAttached. (Note: UINavigationBarDelegate inherits this method from UIBarPositioningDelegate.)

That's it! Now your navigation bar will autoresize as though it were being controlled by an actual navigation controller - without the navigation controller!

Here's the long story:
1) Add the navigation bar to the view controller in the storyboard. Note that the navigation bar doesn't go all the way to the top! Line it up below the battery icon, where the guide "snaps" it in. This looks weird, but trust me, this'll work fine by the time we're done.


2) Set the constraints for the navigation bar in the storyboard. Note: Ctrl-click to connect the navigation bar with the view in the outline; shift-click to select multiple items in the list:
    - Navigation Bar.Top = Top Layout Guide.Bottom
    - Navigation Bar.Leading = Superview.Leading
    - Navigation Bar.Trailing = Superview.Trailing


3) Connect the storyboard's navigation bar to its view controller as an @IBOutlet.


4) In the view controller's class, add a UINavigationBarDelegate protocol to the class declaration. (Note: this protocol inherits from the UIBarPositioningDelegate protocol, allowing us to use the positionBar method in step 6, below.)


5) In the view controller's viewDidLoad method, set the navigation bar's delegate to self. (Note: we can do this since we set the view controller up as a UINavigationBarDelegate in step 4, above.)


6) In the view controller, add the bar positioning delegate's positionForBar method. Return the UIBarPosition representing TopAttached.  (Note: as mentioned in step 4, above, this method is available to our view controller because UINavigationBarDelegate inherits from UIBarPositioningDelegate.)


7) Try flipping back and forth in the simulator (or on a phone)! Notice how the navigation bar is correctly resized and positioned - without any further action on your part!

Thursday, March 17, 2016

Segue Unwind to One of Two View Controllers (Swift 2.1)

Situation: I have a table view and a collection view. Both can go to the same view controller for editing an item. Now, how to get back to the correct starting view?

Resources I used:
Technical Note TN2298: Using Unwind Segues
Specifying the Destination of an Unwind Segue Programmatically
View Controller Programming Guide for iPhoneOS: UsingSegues

How I did it:
- Add an instance variable to both the table and collection view controllers. We'll use this to tell whether the containing controller started the segue. Default it to false, of course.
var startedEditorSegue = false

- Override the prepareForSegue function for both view controllers. Here, we'll set the startedEditorSegue variable to true, since we're starting the segue from the specified controller.
override func prepareForSegue(segue: UIStoryboardSegue, sender: AnyObject?) {
guard let segueId = segue.identifier else {
return
}
switch segueId {
case "tableViewSegueToEditor":
  // this controller is starting a segue to the editor, so unwind needs to return here
startedEditorSegue = true
default:
print("not editor segue")
}
}

Note: I don't have any untitled segues that should be coming through, so I used a guard statement. If you have untitled segues, you may want to use conditional unwrapping (if let segueId = segue.identifier...) or something else instead.


- Override each of the controller's canPerformUnwindSegueAction functions. If the controller started the segue, it will return true due to prepareForSegue code above. If not, the controller will return false.
override func canPerformUnwindSegueAction(action: Selector, fromViewController: UIViewController, withSender sender: AnyObject) -> Bool {
 // if we started the segue, then we can handle it; otherwise, pass
return startedEditorSegue
}
Note: if you need to do multiple unwind actions, you can check which one is occurring via the action parameter. In this case, the parameter will contain my custom selector: unwindFromEditor:


- Create a custom unwind function with the same name in both the table and collection view controllers. Here, we'll reset the startedEditorSegue to false, so it'll be ready for the next round.
@IBAction func unwindFromEditor(segue: UIStoryboardSegue) {

 // the editor's unwind came here; all we need do is revert the indicator
 // to false, so it's valid for the next unwind action
startedEditorSegue = false
}
Note:
* This action doesn't get "connected" to anything, but must be an @IBAction anyway.
* The name of the function can be anything you want.
* The function must have one parameter of type UIStoryboardSegue.


- In the storyboard, CTRL-drag from the editor view controller's button to initiate the segue to the same view controller's exit icon. You'll get a menu with your custom-named unwind action.


Select the action - and you're done!

Now, when the appropriate button is pressed, the unwind segue will traverse your view hierarchy. It'll ask each view whether it can respond to the unwind. Due to the canPerformUnwindSegue function in conjunction with the startedEditorSegue variable, the table and collection view will respond appropriately, and the process will return to the right place.

On a side note: you can give the segue an identifier: select the segue in the Storyboard's document outline, and open its Attributes Inspector.

Happy coding!


Tuesday, March 8, 2016

Dang those broken constraints (because of the status bar!)

I keep looking this up, so here I'm putting it for posterity:

This Xcode error:

<NSLayoutConstraint:0x134682ba0 'UIInputWindowController-top' V:|-(0)-[UIInputSetContainerView:0x13468f180]   (Names: '|':UITextEffectsWindow:0x13468df70 )>"
Means:
    NOTHING! Well, actually, it means simply that the status bar is not in its normal state.

Explanation:
    In certain cases, your iPhone's status bar will be extended. For example, if you're in a call and navigate out of the main call window, a green bar representing the call will appear above the normal status bar area. Another example: if you're using the Personal Hotspot on your iPhone, a blue bar showing the connection status appears above the normal status bar area.

    If you're testing an app while this extended status bar is present, you will get the crazy NSLayoutConstraint/UIInputWindowController-top/UIInputSetContainerView/UITextEffectsWindow error message.

That's all it is, folks! Nothing to worry about at all!