It turned out to be surprisingly easy!
Here's the short version:
1) Add the navigation bar to the view controller in the storyboard.
2) Set the constraints for the navigation bar in the storyboard:
- Navigation Bar.Top = Top Layout Guide.Bottom
- Navigation Bar.Leading = Superview.Leading
- Navigation Bar.Trailing = Superview.Trailing
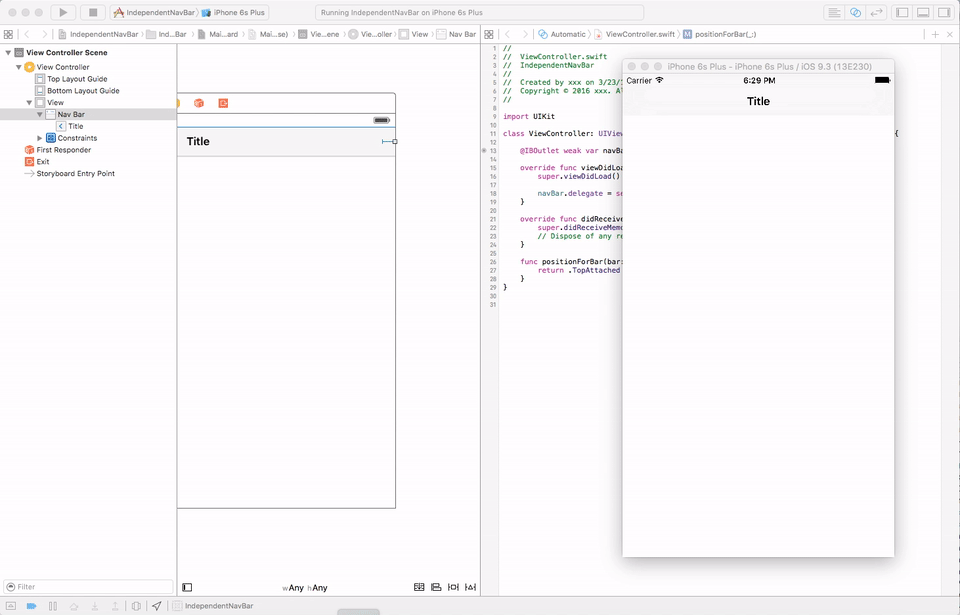
3) Connect the storyboard's navigation bar to its view controller as an @IBOutlet.
4) In the view controller's class, add a UINavigationBarDelegate protocol to the class declaration.
5) In the view controller's viewDidLoad method, set the navigation bar's delegate to self.
6) In the view controller, add the bar positioning delegate's positionForBar method. Return the UIBarPosition representing TopAttached. (Note: UINavigationBarDelegate inherits this method from UIBarPositioningDelegate.)
That's it! Now your navigation bar will autoresize as though it were being controlled by an actual navigation controller - without the navigation controller!
Here's the long story:
1) Add the navigation bar to the view controller in the storyboard. Note that the navigation bar doesn't go all the way to the top! Line it up below the battery icon, where the guide "snaps" it in. This looks weird, but trust me, this'll work fine by the time we're done.

2) Set the constraints for the navigation bar in the storyboard. Note: Ctrl-click to connect the navigation bar with the view in the outline; shift-click to select multiple items in the list:
- Navigation Bar.Top = Top Layout Guide.Bottom
- Navigation Bar.Leading = Superview.Leading
- Navigation Bar.Trailing = Superview.Trailing

3) Connect the storyboard's navigation bar to its view controller as an @IBOutlet.

4) In the view controller's class, add a UINavigationBarDelegate protocol to the class declaration. (Note: this protocol inherits from the UIBarPositioningDelegate protocol, allowing us to use the positionBar method in step 6, below.)

5) In the view controller's viewDidLoad method, set the navigation bar's delegate to self. (Note: we can do this since we set the view controller up as a UINavigationBarDelegate in step 4, above.)

6) In the view controller, add the bar positioning delegate's positionForBar method. Return the UIBarPosition representing TopAttached. (Note: as mentioned in step 4, above, this method is available to our view controller because UINavigationBarDelegate inherits from UIBarPositioningDelegate.)

7) Try flipping back and forth in the simulator (or on a phone)! Notice how the navigation bar is correctly resized and positioned - without any further action on your part!
How to get navigationItem.titleView object ? (to change title to image)
ReplyDeleteYou can set an @IBOutlet for the Nav Item. CTRL-drag from the Nav Item under the Nav Bar in the View Controller Scene to the View Controller code. Then the titleView property will be available to your code.
DeleteQuick point that may escape some developers: the positionForBar method has been renamed. Use:
ReplyDeleteextension ViewController: UINavigationBarDelegate {
func position(for bar: UIBarPositioning) -> UIBarPosition {
return .topAttached
}
}
Also - I'm finding that the new iOS 11 safeAreaInsets/safeAreaLayoutGuide do not honor the space taken by this manually created UINavigationBar, unfortunately.
Please post if you know otherwise!
Good points, Ray! In addition to the function change, iOS 11/Xcode 9 requires a few changes due to the "safe area". First, line up your nav bar with the safe area. Then, when you're setting the constraints, hold down the Option key to display constraints based on the parent view rather than the safe area. That should make the independent bar work correctly.
Delete